How to Add a Sign Up Form with Free MotoPress MailChimp widget
Great news from the MotoPress team! Newly released free WordPress MailChimp widget allows WordPress users to easily add a Sign-up form to the site and link it to one or more lists created in MailChimp account in a few clicks. No need to mess around with coding and design. MotoPress MailChimp widget gives you a free ready-made solution that essentially simplifies the process of integrating and setting a Sign-up form up to your needs.

What makes MotoPress MailChimp Widget worthwhile for users.
Most of the bloggers and owners of corporate websites who built their web projects on the WordPress platform should have developers set up subscription forms on the site and make them synchronize with the MailChimp account. It goes without saying, that all this hassle takes time and money, involves making a lot of settings and constant fixes. Our easy-to-install widget deprives you of that and lets easily manage the whole process.
With MotoPress MailChimp widget you can:
- add several subscription forms to the site and link them to multiple Mailchimp accounts;
- select a type of users’ data the form should collect while subscribing. For instance, you can choose to collect subscriber’s email address only, get email, first and last names, email and first/last name etc . These fields will be displayed on the page accordingly;
- edit button text;
- set the text of success and failure messages;
- automatically update subscribers list in MailChimp account once a person signs up on your site.
As far as you see, the MotoPress Mailchimp widget provides a wide range of options allowing you to add a fully functional sign-up form.
Installation of sign-up form with MailChimp widget is simple as ABC.
To install the MailChimp plugin to your WordPress admin panel just download it at official directory of WordPress plugins and synchronize the plugin with your MailChimp account by using the MailChimp API key.
Once you downloaded MailChimp widget, here are the steps you should follow to complete the installation process:
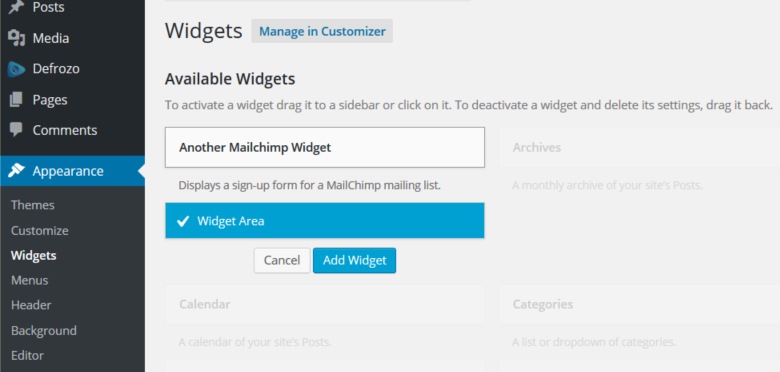
- Click on “Appearance” > “Widgets”.
- In “Available widgets” area hit “Another MailChimp Widget”.
- Click on “Add Widget” button.
You can also add a form to the site hitting Appearance > Customize > Widgets.
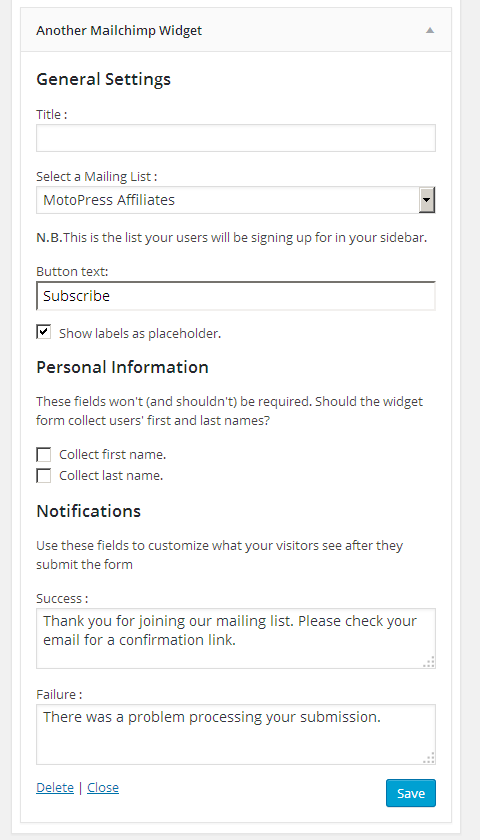
In “General settings” of the form enter the title of the form, choose a mailing list you would like to link a form to, change a button text if needed, choose the type of personal data the form should collect, alter the text of success and failure messages subscribers will see upon submitting the form. After all the settings are made click “Save” button.
Once the settings are saved the form should appear on your WordPress website. Here are some examples how it can look like:


Why it is convenient to use MotoPress MailChimp plugin for your WordPress site.
MotoPress MailChimp plugin is a perfect solution for advanced WordPress users as well as newbies. It is a comprehensive and easy-to-install tool that lets effortlessly add a Signup form to the site and customize it up to your needs. All these are possible with the help of built-in options right in the WordPress admin panel.
The widget is automatically synchronized with your MailChimp account upon installation and deprives you of constant logging into the MailChimp account and manual updating the subscribers list. This MotoPress plugin allows you to add several forms to the site and link them to different mailing lists accordingly. Boost your online business by increasing your subscribers’ lists with our free MailChimp widget from the MotoPress team.


Hi,
Though I like the simplicity of the plugin, I was hoping for it’s integration with the Motopress Content editor. Is there any chance of it in the future?
Hi Ankit,
Thank you for your feedback. We have added your suggestion to our feature request list for developers to review it. They will define whether to put it to further updates.